[译]WebGL 基础系列:WebGL 工作机制
原文地址:http://webglfundamentals.org/webgl/lessons/webgl-how-it-works.html

This is a continuation from WebGL Fundamentals.
Before we continue I think we need to discuss at a
basic level what WebGL and your GPU actually do. There are basically 2
parts to this GPU thing. The first part processes vertices (or streams of
data) into clipspace vertices. The second part draws pixels based on the
first part.
本文是上一章节WebGL 基本原理内容的延续。开始之前,我认为我们应该先理解 WebGL 和 GPU 在底层上的工作机制。GPU 其实主要处理两方面的事情,首先把顶点信息(或数据流)处理成 WebGL 空间中的顶点,然后再次基础上,逐像素绘制图形。
When you call
当我们调用下面的命令时
1 | gl.drawArrays(gl.TRIANGLE, 0, 9); |
The 9 there means “process 9 vertices” so here are 9 vertices being processed.
参数中的9表示我们接下来需要处理9个顶点信息
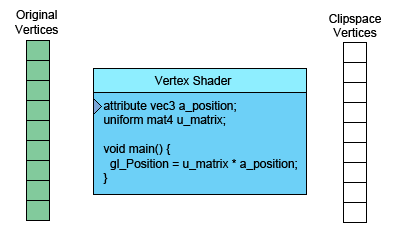
On the left is the data you provide. The vertex shader is a function you
write in GLSL. It gets called once for each vertex.
You do some math and set the special variablegl_Positionwith a clipspace value
for the current vertex. The GPU takes that value and stores it internally.
左边是我们提供的顶点数据,中间是我们着色器代码,它是用GLSL编写的函数。每个顶点都会调用一次顶点着色器,这里需要对当前的顶点做些运算,从而转换成 WebGL 空间数据提供给 gl_Position 变量。GPU 会使用这些数据并在内部存储起来。
Assuming you’re drawing
TRIANGLES, every time this first part generates 3
vertices the GPU uses them to make a triangle. It figures out which
pixels the 3 points of the triangle correspond to, and then rasterizes the
triangle which is a fancy word for “draws it with pixels”. For each
pixel it will call your fragment shader asking you what color to make that
pixel. Your fragment shader has to set a special variablegl_FragColor
with the color it wants for that pixel.
假设现在需要绘制 三角形,那么 GPU 会在第一个步骤中通过3个顶点来确定三角形的位置。然后,GPU 可以知道哪些像素是属于该三角形的,最后逐像素绘制三角形,我们称之为光栅化。针对每一个像素点,它都需要调用片元着色器来获取当前需要绘制的颜色值。片元着色器需要把像素上的颜色值设置到 gl_FragColor 变量中。
That’s all very interesting but as you can see in our examples to up
this point the fragment shader has very little info per pixel.
Fortunately we can pass it more info. We define “varyings” for each
value we want to pass from the vertex shader to the fragment shader.
这就是全部有趣的地方,但是从例子中可以看到,我们当前在片元着色器上放置的像素信息还非常少。在后续的内容中,我们会给它提供更多的信息。如果需要从顶点着色器向片元着色器传递数据,那么我们需要为传递的每一个值设定 varying 变量。
As a simple example, let’s just pass the clipspace coordinates we computed
directly from the vertex shader to the fragment shader.
在当前这个简单的示例中,我们只需要从顶点着色器向片元着色器传递计算好的空间坐标数据。
We’ll draw with a simple triangle. Continuing from our
previous example let’s change our F to a
triangle.
我们先来绘制一个简单的三角形。示例代码来自于前一个例子。我们稍微做下调整,将 F 修改为三角形。
1 | // 将三角形相关数据传递给缓冲对象 |
And we have to only draw 3 vertices.
然后,我们只需要绘制3个顶点。
1 | // 绘制场景 |
Then in our vertex shader we declare a varying to pass data to the
fragment shader.
在顶点着色器中,我们需要声明一个 varying 变量来将数据传递给片元着色器。
1 | varying vec4 v_color; |
And then we declare the same varying in the fragment shader.
然后,我们在片元着色器中声明一个同名的 varying 变量。
1 | precision mediump float; |
WebGL will connect the varying in the vertex shader to the varying of the
same name and type in the fragment shader.
WebGL 会将顶点着色器和片元着色器中的同名 varying 变量连接起来,这样他们的信息就“同步”了。
译者注:这里的“同步”并不是直接传值,这其中发生了光栅化的过程,根据绘制的图形,对顶点着色器中的 varying 变量进行内插,然后再传递给片元着色器中的 varying 变量。
Here’s the working version.
下面是一个可执行的代码版本。
Move, scale and rotate the rectangle. Notice that since the colors are
computed from clipspace they don’t move with the rectangle. They are
relative to the background.
自己试试移动、缩放和旋转下那个三角形。你可能会注意到,三角形的颜色并不会跟随三角形一起移动。这是因为,颜色值是根据像素的坐标位置计算而来,它们只跟背景位置相关联。
Now think about it. We only compute 3 vertices. Our vertex shader only
gets called 3 times therefore it’s only computing 3 colors yet our
triangle is many colors. This is why it’s called a varying.
现在我们在这里思考下。我们只计算了3个顶点,顶点着色器也只被调用了3次,因此只能计算3个颜色值,但是三角形内部有非常多的颜色,它们是如何计算出来的呢?这就是我们使用 varying 变量的原因。
WebGL takes the 3 values we computed for each vertex and as it rasterizes
the triangle it interpolates between the values we computed for the
vertices. For each pixel it calls our fragment shader with the
interpolated value for that pixel.
WebGL 首先会使用我们计算好的3个顶点数据,然后在对三角形进行光栅化的时候,它会使用内插的方法来计算内部各个像素上的值。
In the example above we start out with the 3 vertices
在上面的例子中,我们开始有3个顶点值。
| Vertices |
| 0 | -100 |
| 150 | 125 |
| -175 | 100 |
Our vertex shader applies a matrix to translate, rotate, scale and convert
to clipspace. The defaults for translation, rotation and scale are
translation = 200, 150, rotation = 0, scale = 1,1 so that’s really only
translation. Given our backbuffer is 400x300 our vertex shader applies
the matrix and then computes the following 3 clipspace vertices.
顶点着色器使用矩阵来实现变换、旋转、缩放和坐标转换等操作。这里变换、旋转和缩放的默认值分别为 translation = 200, 150、rotation = 0、scale = 1,1 所以这里只看到了转换的效果。把绘图背景大小设置为 400x300,顶点着色器会使用矩阵来计算得出下面的3个空间坐标。
| values written to gl_Position |
| 0.000 | 0.660 |
| 0.750 | -0.830 |
| -0.875 | -0.660 |
It also converts those to colorspace and writes them to the varying v_color that we declared.
同时,也会将这些值转换成相应的颜色值,并将它们写入我们已经声明的varying v_color 变量。
| values written to v_color |
| 0.5000 | 0.750 | 0.5 |
| 0.8750 | 0.915 | 0.5 |
| 0.0625 | 0.170 | 0.5 |
Those 3 values written to v_color are then interpolated and passed to the
fragment shader for each pixel.
这3个被写入 v_color 的值会在经过内插的过程后传递给片元着色器,片元着色器因此可以恰当的得到图形上其他像素的颜色值。
We can also pass in more data to the vertex shader which we can then pass
on to the fragment shader. So for example let’s draw a rectangle, that
consists of 2 triangles, in 2 colors. To do this we’ll add another
attribute to the vertex shader so we can pass it more data and we’ll pass
that data directly to the fragment shader.
我们可以给顶点着色器传递更多的数据,以便于片元着色器可以使用这些数据。所以下面的例子,我们就来绘制一个矩形,它包含了两个不同颜色的三角形。为了达到这个目的,我们需要给顶点着色器添加一个 attribute 变量,这样片元着色器可以使用这些数据进行后续处理。
1 | attribute vec2 a_position; |
We now have to supply colors for WebGL to use.
现在可以提供颜色值给 WebGL 使用了。
1 | // 获取存储位置 |
And here’s the result.
下面就是最终的效果。
Notice that we have 2 solid color triangles. Yet we’re passing the values
in a varying so they are being varied or interpolated across the
triangle. It’s just that we used the same color on each of the 3 vertices
of each triangle. If we make each color different we’ll see the
interpolation.
注意,现在我们有了2个纯色三角形。我们使用 varying 变量来设置相关值,这样它们可以方便的在三角形内部做内插。上面的例子中,三角形的3个顶点使用了相同的颜色,所以显示的是纯色的三角形。如果我们设置不同的颜色值,那么可以通过下面的代码来观察不同的效果。
1 | // 设置2个三角形的颜色 |
And now we see the interpolated varying.
现在我们可以看到变化后的 varying 效果了。
Not very exciting I suppose but it does demonstrate using more than one
attribute and passing data from a vertex shader to a fragment shader. If
you check out the image processing examples
you’ll see they also use an extra attribute to pass in texture coordinates.
我猜这可能不是那么有趣,但是这至少证明了可以从顶点着色器向片元着色器传递多个属性数据。如果你看过图片处理的例子,你就会发现那些例子其实也是使用额外的属性来传入纹理坐标的。
What do these buffer and attibute commands do?
上面这些缓冲和属性命令的作用是什么?
Buffers are the way of getting vertex and other per vertex data onto the
GPU.gl.createBuffercreates a buffer.gl.bindBuffersets that buffer as the buffer to be worked on.gl.bufferDatacopies data into the buffer.
缓冲去对象用来存储顶点和相关数据。gl.createBuffer 方法用来创建缓冲区对象。gl.bindBuffer 设置缓冲区对象为工作对象。gl.bufferData 将数据放入缓冲区对象。
Once the data is in the buffer we need to tell WebGL how to get data out
of it and provide it to the vertex shader’s attributes.
当缓冲区对象中存入数据后,我们需要告诉 WebGL 获取数据并把这些数据提供给顶点着色器的属性。
To do this, first we ask WebGL what locations it assigned to the
attributes. For example in the code above we have
为了做到这点,我们首先需要获取到 WebGL 分配给这些属性的地址。拿上面的代码举例:
1 | // look up where the vertex data needs to go. |
Once we know the location of the attribute we then issue 2 commands.
一旦我们知道属性的地址就可以执行下面2个命令。
1 | gl.enableVertexAttribArray(location); |
This command tells WebGL we want to supply data from a buffer.
这条命令告诉 WebGL 我们相处缓冲对象中获取数据。
1 | gl.vertexAttribPointer( |
And this command tells WebGL to get data from the buffer that was last
bound with gl.bindBuffer, how many components per vertex (1 - 4), what the
type of data is (BYTE,FLOAT,INT,UNSIGNED_SHORT, etc…), the stride
which means how many bytes to skip to get from one piece of data to the
next piece of data, and an offset for how far into the buffer our data is.
这条命令告诉 WebGL 从缓冲区对象中将数据分配出去。numComponents 指定缓冲区中每个顶点的分量个数(1到4)。typeOfData 表示数据格式(BYTE, FLOAT, INT, UNSIGNED_SHORT等)。strideToNextPieceOfData 表示相邻两个顶点间的字节数。offsetIntoBuffer 指定缓冲区对象中的偏移量。
Number of components is always 1 to 4.
再次提醒下,缓冲区中的分量个数范围为 1 到 4。
If you are using 1 buffer per type of data then both stride and offset can
always be 0. 0 for stride means “use a stride that matches the type and
size”. 0 for offset means start at the beginning of the buffer. Setting
them to values other than 0 is more complicated and though it has some
benefits in terms of performance it’s not worth the complication unless
you are trying to push WebGL to its absolute limits.
如果每中类型的数据只使用了一个缓冲区对象,那么 stride 和 offset 都为 0。0对于 stride 意味着“使用符合类型大小的 stride”。0对于 offset 意味着起点在缓冲开始位置。如果设置为其他非0值,可能会让情况变得复杂,但是一般这么做是处于性能优化的目的。一般情况下,这种做法是值得尝试的。
I hope that clears up buffers and attributes.
最后记得清理缓冲和属性值。
Next let’s go over shaders and GLSL.
下一章节,我们将会学习着色器和 GLSL。